

Zoho Campaigns Setup Guide Step-by-Step
Setting up Zoho Campaigns is straightforward on the surface. You create an account, import contacts, design an email, and hit send. But most businesses skip the steps that actually determine whether campaigns succeed or land in spam folders.
Domain authentication, list validation, opt-out sync, and topic management are not optional extras. They are the foundation of deliverability and engagement. Skipping them is the most common reason email campaigns underperform, even on a capable platform like Zoho Campaigns.
This guide walks you through the complete Zoho Campaigns setup in the correct order, based on real implementation experience. At CRM Master’s Infotech, a certified Zoho Partner, we have set up and audited Zoho Campaigns accounts across industries, and the same mistakes appear every time. We have flagged each one throughout this guide so you know exactly where the risks are.
If you would rather have it done right the first time, we offer a free 30-minute Zoho Campaigns audit call for our expert Zoho Consulting Services.
What is Zoho Campaigns?
Zoho Campaigns is Zoho’s dedicated email and SMS marketing platform. It handles campaign creation, contact list management, segmentation, marketing automation workflows, A/B testing, and performance reporting.
It connects natively with Zoho CRM and the rest of the Zoho suite, making it the natural choice for businesses already using Zoho tools. Unlike third-party connectors, the Zoho CRM to Campaigns sync works out of the box with no extra configuration.
Zoho Campaigns sits in a practical sweet spot: more capable than entry-level tools like Mailchimp’s free tier, and significantly more affordable than enterprise platforms like HubSpot Marketing Hub or Marketo.
How to Set Up Zoho Campaigns: Step-by-Step
Step 1: Create Your Zoho Account
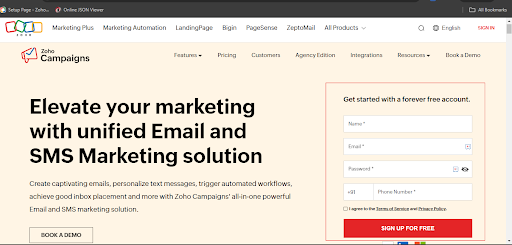
Visit the Zoho Campaigns website and sign up for an account. Once your details are submitted, you will be directed to the Zoho Campaigns dashboard.
If you already have a Zoho account (for CRM, Books, or any other Zoho product), you can log in with the same credentials. Zoho Campaigns is part of the shared Zoho ecosystem, so no separate login is needed.
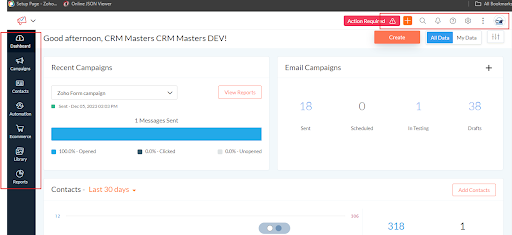
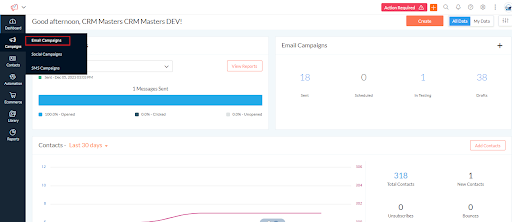
Step 2: Understand Your Zoho Campaigns Dashboard
Before you start building campaigns, take a few minutes to familiarise yourself with the dashboard layout. Knowing where each feature lives saves time later.
The right side of the dashboard includes icons for Account Settings, Help Center, Notifications, Calendar, Folders, and Favourites.
The top left shows two icons next to the Campaigns button. The “+” button lets you quickly create anything in your account, including campaigns, SMS messages, and autoresponders.
Left sidebar navigation includes:
- Campaigns: Create email, social media, and SMS campaigns. You can publish directly to LinkedIn, Twitter, and Facebook through Zoho Social Campaigns. SMS Campaigns support direct text message marketing.
- Contacts: Build and manage your email lists, segments, contact tags, and signup forms.
- Automation: Set up autoresponders and workflow sequences to send emails automatically based on triggers.
- E-commerce: Connect your e-commerce store to Zoho Campaigns to run product-specific campaigns, recover abandoned carts, and bring back inactive customers.
- Library: Store and manage images, email templates, workflow templates, form templates, and attachments in one place.
- Reports: Access campaign analytics, including open rates, click rates, bounce rates, and other key performance indicators.
Step 3: Create Your Email List
- Scroll to the top and tap on Contacts
- Choose the lists from the drop-down menu
- Go to the top right-hand corner and click on ‘Create list.’
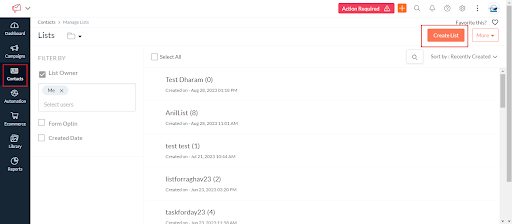
- Type in the name of your first list next to ‘Name’.

- Enter the name of the list that your list leads, customers, newsletter, or subscribers. Click ‘Save’.
- Now, add contacts to your new email list. You have two options for adding contacts.
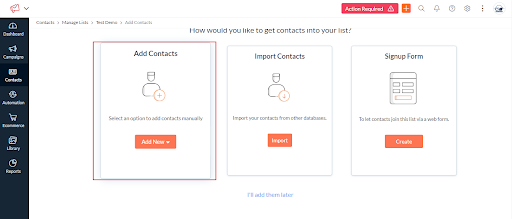
Select ‘Add Contacts’ to manually add your contact. – Alternatively, select ‘Import Contacts’ to import your contacts if you already have a list of contacts.
Once you’ve added your contacts:
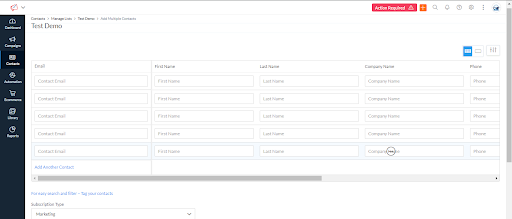
Click on ‘Multiple Fields’ at the right end of the page by the three icons, then choose this option. If you only want email addresses, select ‘Email Address Only‘. Click ‘Organize Columns’ to arrange your data. Click ‘Create Campaign’ to start a campaign. Hover over ‘Create Campaign’ and click the three dots for more options. List.
(Note for readers: If you are migrating from another email marketing platform, Zoho Campaigns supports direct imports from Mailchimp and other tools, which simplifies the transition.)
Also Read: Zoho Campaigns vs Mailchimp
Step 4: Create Segments
Segments allow you to group contacts based on specific criteria, so you can send targeted emails instead of blasting your entire list with the same message. Segmented campaigns consistently outperform unsegmented ones in open rates and conversions.
To create Segments:-
- Go to Contacts in the left sidebar.
- Click Segments
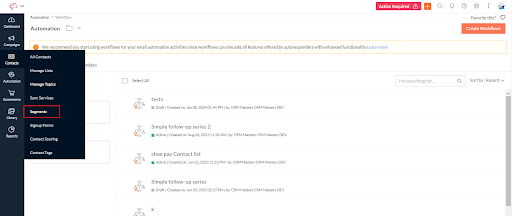
- Navigate to the “Create a Segment” section.
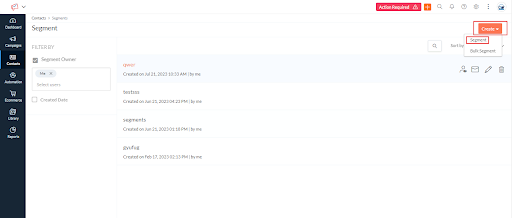
- Once you have access to this area, you will encounter various options, such as Name and Criteria.
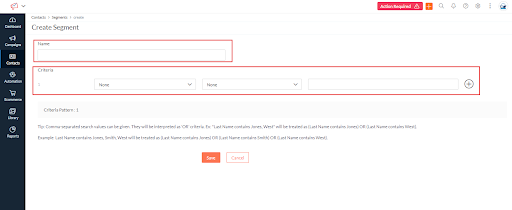
- You are then prompted to add your details, which will be integrated into this segment.
- Upon completion, you will find the option to “Save As” displayed, illustrating the criteria for contacts to be included in this segment.
You can add multiple segments if you prefer, depending on the nature of your business and how you wish to categorize your contacts within your email list.
Step 5: Create Signup Forms
Once you’ve added your segments, you can create a signup form.
- Navigate back to ‘Contacts’ and then move to ‘Manage Lists’.
- Next, navigate to ‘Signup Forms’ and click on it.
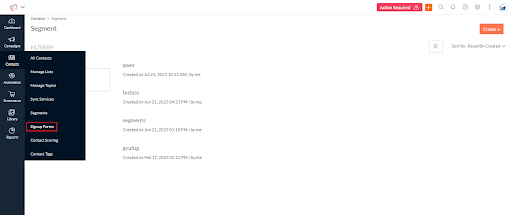
- Choose ‘Create Sign Up Form’.

- Type in a name for your new form using the pencil icon at the top of the page.
![]()
Note that each signup form is linked to a specific email list. Any contact who submits the form is automatically added to that list. To change the linked list, click the pencil icon next to the list name.
Scroll down to Choose Template to pick the style of form you want. Zoho Campaigns offers several form types, including embedded forms, pop-up forms, and hosted forms that you can share as a direct link.
Step 6: Create Your First Email Campaign
Now that your lists and segments are in place, you can build your first campaign.
Click on the “Campaigns” section in the sidebar on the left.
- Click on “Create Campaign”
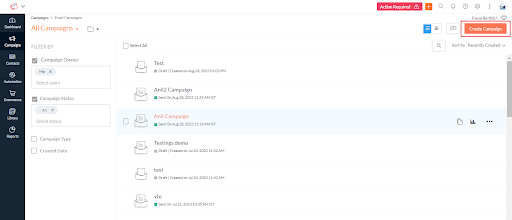
- Select Regular Email
- Add a campaign name to differentiate it from the others. If your account is only assigned the default topic, you can directly click Save and Proceed.
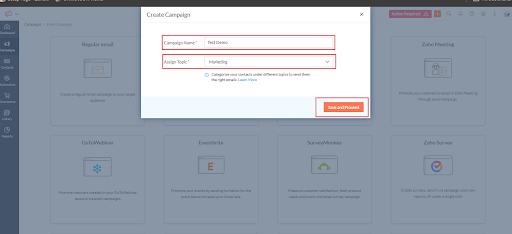
- If not, you must select a topic, then click save and proceed.
- To change your campaign’s name, simply click the Edit icon in the top-left corner. If you wish to add the campaign to a specific folder, click Add to Folder.
- For the subject line and pre-header text of your email, click Add Subject and enter the corresponding details, then click Save.
- To enter the sender’s name for your email, click Add Sender Details and fill in the necessary information.
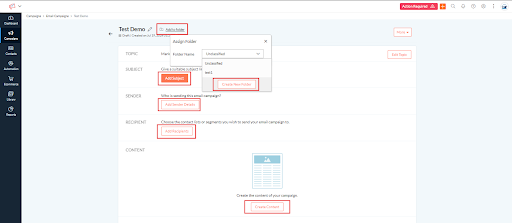
- If you’d like to enable reply tracking, click Show Reply-to Details and specify a reply-to address. This step will also save your changes.
- To select the contacts who will receive your email campaign, click Add Recipients. Choose between mailing lists or segments, then proceed to Save.
- To exclude specific contacts from receiving the campaign, click Exclude Contacts.
- Choose contacts either by selecting a campaign they have previously received or by their inclusion in a particular mailing list, then click Save.

Choose a template from one of the options provided:
- Saved Templates
- Pre-designed Templates
- Basic Templates
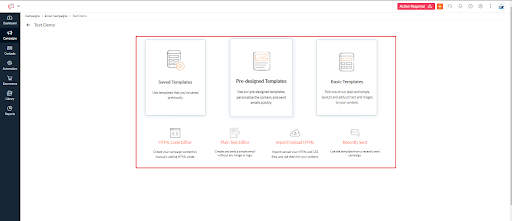
Furthermore, you may opt to incorporate content sourced from:
- HTML Code Editor
- Plain Text Editor
- Import / Upload HTML
- Recently Sent
- Add your content and proceed. Additionally, you have the opportunity to preview and test your email campaign.
- You may proceed to send a test email to observe the appearance of the message within the recipients’ inboxes. Please proceed to click Send test email.
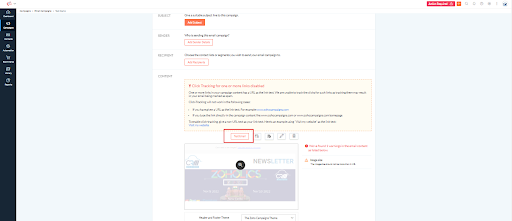
- Select the email addresses you wish to send your test email to. You may select a maximum of 5 email addresses and proceed to click the “Send Test Email” button.
- To observe the appearance of your email on various email clients and devices, please proceed to the Inbox Preview feature.
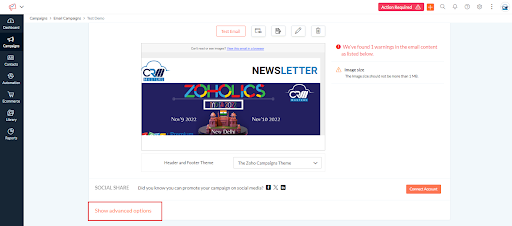
- To introduce a header and footer within your Campaign, select “Change” from the menu.
To advertise your email campaign across different social media sites, follow these steps:
1. Click on Connect Account.
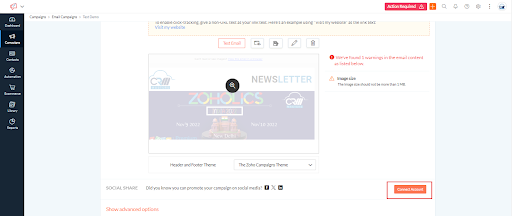
2. Choose the social media platform of your choice to advertise your campaign.
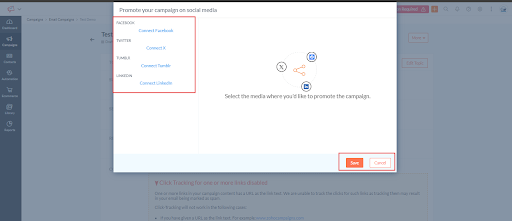
3. Save your selection.
4. Go to Show Advanced Options.
5. Now set up tracking, Integration, Contact scoring, scheduling, and much more for your email campaign.
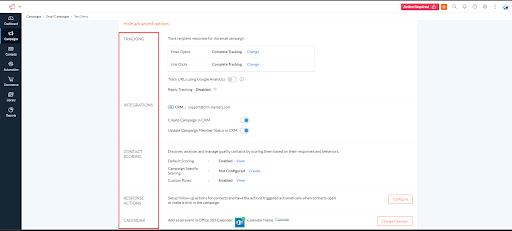
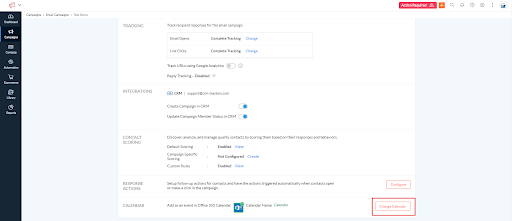
You can choose to track plain text URLs, track URLs using Google Analytics, and track video views in Wistia. Just enable the toggle button to start tracking.
![]()
- Select Configure to include this campaign in your Office 365 Calendar.
- Choose Review and Launch to forward your email campaign for review, and it will be dispatched immediately following the review process.

- You also have the option to dispatch the campaign at a later time.
Step 7: Set Up A/B Testing
A/B testing, also called split testing, lets you test two versions of a campaign to find out which one performs better before sending it to your full audience. It removes guesswork from email marketing decisions.
To run an A/B test in Zoho Campaigns:
- Click Campaigns and then Create Campaign.
- Select A/B Test as your campaign type.
- Enter a campaign name and select your topic, then click Save and Proceed.
- Create two versions of your email. You can test different subject lines, sender
- names, or email body content between Version A and Version B.
- Set the test criteria:
- What percentage of your audience receives each version
- How the winner is determined: by open rate, click rate, or manual selection
A/B testing is one of the most effective ways to continuously improve your email engagement over time.
Step 8: Set Up Multi-User Access and Roles
Zoho Campaigns allows multiple users to access a single account, making it easy for your team to collaborate on email campaigns. You can assign custom roles and set privileges to control what each team member can see and do within the account.
To add users and manage roles:
If your team shares responsibility for email marketing, Zoho Campaigns lets you add multiple users and assign roles to control what each person can do within the account.
To manage users and roles:
- Click your Account icon in the top right corner.
- Navigate to Users and Roles from the account settings menu.
- Click Invite User and enter the email address of the team member you want to add.
- Assign a predefined role: Administrator, Campaign Manager, or Content Creator.
- To create a custom role with specific permissions, click Add Role, name it, and select the exact access levels you need.
- Click Send Invite. The team member receives an email to join the account.
You can update or remove user access at any time from the Users and Roles section.
Step 9: Set Up Third-Party Integrations
Zoho Campaigns integrates with a wide range of platforms so your contact data and workflows stay in sync across all your business tools.
To set up an integration with professional Zoho Integration Services:
- Click the Settings icon from your dashboard.
- Navigate to Integrations.
- Browse available integrations and select the platform you want to connect.
Available integrations include:
- Zoho Suite: Zoho CRM, Zoho Bigin, Zoho Commerce, and more. These native integrations sync contacts, automate workflows, and align your sales and marketing without any middleware.
- CRM Platforms: Salesforce, HubSpot, Microsoft Dynamics 365, Sugar CRM. Syncing these keeps your subscriber lists current based on CRM activity.
- Productivity and Event Tools: G Suite and Eventbrite for importing contacts directly into your mailing lists.
To complete a connection, click Connect next to the platform, log in with your credentials, authorise the integration, and configure sync settings such as contact list mapping and field alignment. Save the integration, and Zoho Campaigns will sync data automatically going forward.
Common Zoho Campaigns Setup Mistakes to Avoid
Based on real-world implementation experience as a trusted Zoho Implementation Partner, these are the mistakes that appear most frequently:
1. Skipping domain authentication: Without SPF, DKIM, and DMARC records, your emails are far more likely to land in spam.
2. Importing unverified contact lists: Sending to unvalidated lists increases bounce rates and damages your sender reputation.
3. Not configuring opt-out sync: If unsubscribes are not reflected across all your platforms, you risk compliance violations under GDPR and CAN-SPAM.
4. Ignoring topic management: Topics allow contacts to choose which types of emails they receive. Not setting them up leads to higher unsubscribe rates.
5. Sending without testing: Always preview and test emails across devices before launching a campaign.
6. Neglecting list segmentation: Sending the same message to your entire list reduces relevance and engagement.
Need expert help setting up Zoho Campaigns?
Zoho Campaigns is a capable email marketing platform, but its results depend entirely on how well it is set up. Working through this step-by-step guide, from account creation and list building through to segmentation, A/B testing, and integrations, gives you a solid foundation for email campaigns that actually reach inboxes and drive results.
The steps most people skip are the ones that matter most. Getting them right from the start saves significant time and protects your sender’s reputation.
Ready to Get More Out of Zoho Campaigns?
CRM Masters is a certified Zoho Partner with hands-on experience implementing and auditing Zoho Campaigns accounts across industries. Contact us today for expert guidance and a free 30-minute audit call.
FAQ
Q1. Is Zoho Campaigns free?
Ans. Zoho Campaigns offers a free plan for up to 2,000 contacts and 6,000 emails per month. Paid plans scale based on contact count and include features like automation workflows, advanced segmentation, and priority support.
Q2. How does Zoho Campaigns integrate with Zoho CRM?
Ans. Zoho Campaigns connects natively with Zoho CRM. You can sync CRM contacts directly into mailing lists, trigger campaigns based on CRM activity, and push email engagement data back into CRM records for a complete view of customer interactions.
Q3. Can I use Zoho Campaigns without Zoho CRM?
Ans. Yes. Zoho Campaigns works as a standalone email marketing platform. You do not need a Zoho CRM account to use it, though the native integration is a significant advantage for businesses that use both tools.
Q4. What types of campaigns can I send with Zoho Campaigns?
Ans. Zoho Campaigns supports regular email campaigns, A/B test campaigns, autoresponder sequences, automation workflows, SMS campaigns, and social media campaigns across LinkedIn, Twitter, and Facebook.
Q5. How do I improve email deliverability in Zoho Campaigns?
Ans. The most important steps are authenticating your sending domain with SPF, DKIM, and DMARC records, keeping your contact lists clean and verified, maintaining a low bounce rate, and ensuring all contacts have explicitly opted in.